How To Customize and Mod Your TMNT Action Figures
If you're a fan of the Teenage Mutant Ninja Turtles, you know how much fun it can be to collect and play with the TMNT action figures. But what if you want to take your turtle toys to the next level?
Customizing and modding your figures can make them truly unique and give them a personal touch. This comprehensive guide will walk you through various methods, tips and tricks to customize your TMNT toys and make them your own. Let's get started!
The best way to customize your TMNT action figures is to repaint them, add new accessories or modify their weapons and gear. Careful sculpting or use of model putty can also change shapes and add new details.
Gather Your Supplies
Before you start modding your figures, you'll need to gather the right supplies. Here are some of the basic items you'll need:
- Acrylic paints - Get a selection of basic colors as well as metallics and neons for added pop. Make sure the paint adheres to plastic.
- Paint brushes - An assortment of small brushes will help with detail work.
- Sandpaper - Fine grit sandpaper helps prep the surface before painting.
- Clear matte sealant - This seals the paint and protects your custom paint job.
- Model putty or epoxy sculpt - For reshaping and adding sculpted details.
- Glue - Super glue or plastic-bonding cements for gluing accessories.
- X-Acto knife - For carving and shaping modifications.
- Scrap plastic - Leftover bits can be used for custom parts.
- Acetone - Only needed if you want to strip the original paint before repainting. Use with caution.
Prep the Surface
Before painting your figures, you'll need to properly prep and clean the surface. Give them a wash with mild soap and water. Use fine grit sandpaper to scuff up shiny plastic surfaces - this helps the new paint adhere better.
Wipe away any dust with a tack cloth. Apply 1-2 thin coats of primer, letting it fully dry between coats. Primer creates a uniform surface for the acrylic paint.
Repainting Your Figures

This is the fun part where you get to transform the look of your turtle figures! What color scheme will you give them? Some ideas:
- Realistic turtle colors - Greens, yellows, browns
- Camouflage or military schemes
- Bright primary colors
- Metallic armor or tech details
- Your favorite sports team colors
Use thin layers of acrylic paint to build up coverage. Let layers dry fully before adding more. Blend adjacent colors together so transitions are smooth. Add smaller details with a fine brush.
Outline key areas like eyes, logos and tech details with black and white acrylic paint for pop. Finish off with a few coats of clear matte sealant to protect the paint.
Sculpting New Details
For major reshaping or adding new sculpted elements, use small amounts of epoxy sculpt or model putty. These 2-part substances cure into hardened plastic that can be sanded, painted, drilled or carved.
Some ideas:
- Reshape head/shell to make a custom turtle
- Add fins, spikes, horns or other textures
- Sculpt armor, tech details or a helmet
- Create a bandana, mask or other clothing
- Attach a whole new sculpted arm, weapon or other accessory
Work in small sections, letting fully cure between additions. Use an X-acto knife to carve finer details. Sand when fully cured. Prime and paint to match the rest of the figure.
Customizing Weapons and Accessories
The turtles' weapons and ninja gear are easy to modify for a more unique look. Some options include:
- Cutting and reattaching parts in new configurations
- Adding sculpted elements like spikes, blades or handles
- Wrapping weapon handles with leather or cloth
- Kitbashing pieces from multiple toys to make hybrid weapons
- Painting on new colors, logos, details or weathering
- Making holsters, sheaths or backpacks from scrap plastic
Glue, epoxy putty and bobby pins or wire can help attach new elements. Repaint to match. Add logos or designs with vinyl model decals.
Head and Facial Customization
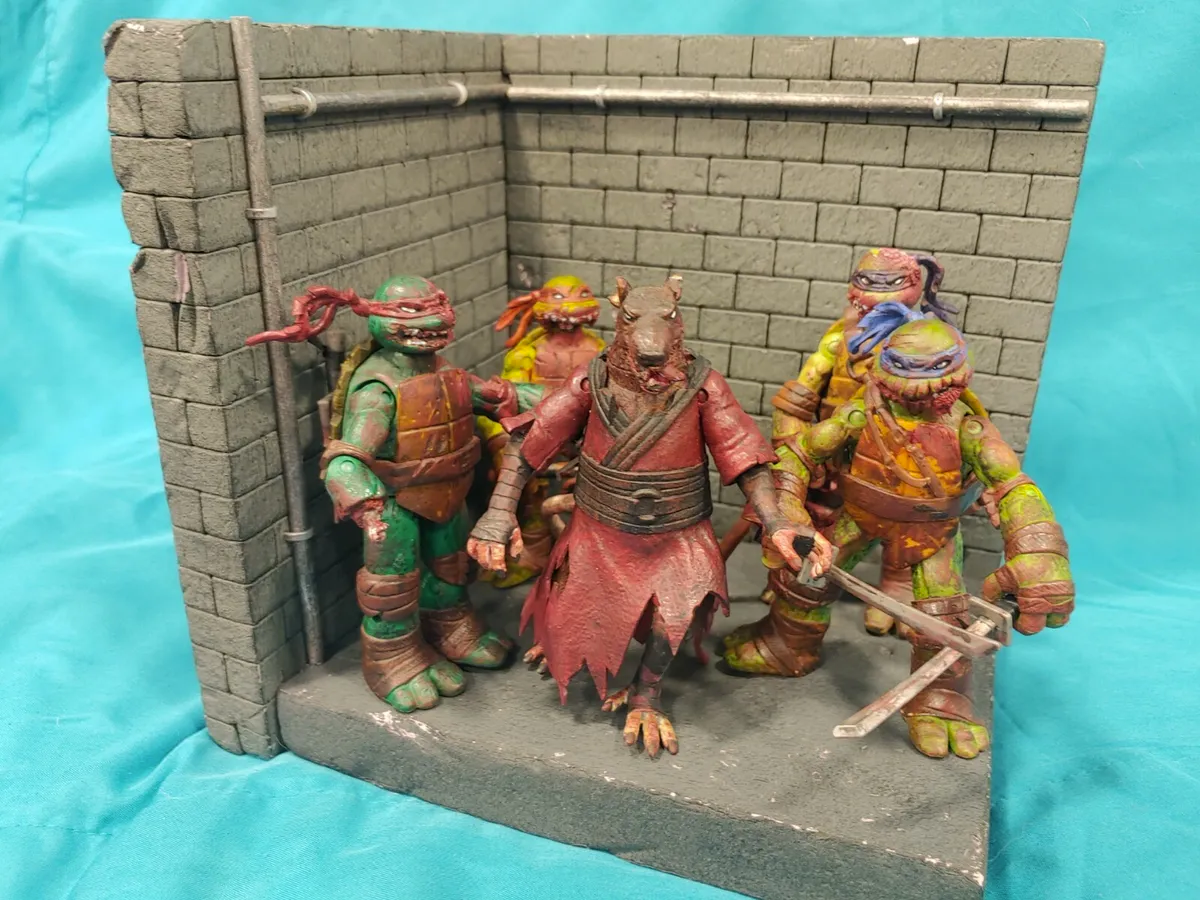
There are many ways to customize your turtle's head and face:
- Resculpt or extend the mask/bandana area with epoxy putty
- Add a custom textured paint effect to create "battle damage"
- Use small dabs of putty to add scars, blemishes or a unique expression
- Paint the head a new color either solid or camouflage pattern
- Replace the eyes with clippings from transparent colored plastic or beads
- Open the mouth more and add a tongue and teeth from putty or plastic bits
Take care not to overdo it around the eyes and mouth. Small changes make a big difference.
Custom Bases For TMNT Figures
For creative display, make a themed base for your customized TMNT figures. Here are some ideas:
- City rooftop with vents and pipes from plastic bits
- Manhole cover pavement scene
- Oozy sewer terrain from foam, clay and plastic bits
- Dojo floor with martial arts weapons and items
- Technodrome interior with Kraang tech details
- Rock quarry or natural landscape
- Warzone battleground with sandbags, etc.
Paint bases to match the theme and glue down your repainted turtle figures in action poses. Add plastic bits, model train accessories and other found items to bring the base to life.
Body Modifications and Kitbashing
For major changes to the body, you can:
- Take apart the figure and trim away plastic from limbs, torso, etc before reassembling
- Use a Dremel tool to carve totally new shapes into the body and shell
- Kitbash together parts from multiple toys to make a hybrid figure
- Sculpt extensions like longer limbs, a spiked shell or extra appendages
- Add a flexible "armature" skeleton if making very modified limbs to keep poseable
Body mods require time and care to look natural. Prime and paint all elements to match.
Weathering Effects
Add some hard-worn "battle damage" to make your TMNT figures look rough and ready for action.
- Use silver/gray paints to add metallic scratches and scuffs
- Paint on smudges or mud splatters with thinned acrylics
- Glue small bits of plastic or rock to look like rubble or debris
- In jagged layers, add mixtures of paint, sand and superglue to create interesting texture
Go easy with weathering to keep it realistic. Focus on high-impact areas and joints. Seal when done.
Using LEDs and Electronics
Adding lights and electronics can take your TMNT customs to the next level. Small LEDs are easy to wire and install. Some ideas:
- Headlight eyes - Carefully place small LEDs behind the eyes and run wiring to the battery pack. Use translucent beads/plastic for glowing effect.
- Interior lighting - Illuminate techy areas like Donatello's gadgets or the Technodrome with small LED strips. Diffuse with plastic.
- Laser/energy weapons - Install LEDs in the ends of weapons powered by coin cell batteries. Add a switch.
- Flashing or pulsing lights - Make a circuit with LEDs and a flashing or sound module for fun effects.
- EL wire - Use thin, flexible electroluminescent wire to outline areas and make them glow. Invert clear plastic over top for color.
- Tiny video screens - Add a small world of pixels display linked to a microcontroller like Raspberry Pi for custom graphics.
Take precautions against burning out LEDs with proper resistors. Miniature surface mount components allow for compact lighting. Simple soldering skills open up many options.
Using Modeling Clay
Oil-based modeling clay offers a temporary way to sculpt modifications and test out ideas before committing them to a permanent material.
Some ways to use clay:
- Sculpt new head or facial features - horns, snout, angry expression, etc.
- Add textures like scales, bumps, scars or cracks
- Reshape limbs, muscles, torso
- Mimic epoxy putties for a test run
- Make thick armor panels, clothing or sashes
- Create environmental bases and scenery
Take care not to bake clay in an oven or allow it to get too hot. It can melt and stick to your figure! Photos help preserve clay sculpts before reworking the design.
Making Soft Goods
Add realism using cloth, leather or rubber for gear like:
- Masks and bandanas - Cut fabric and glue neatly in place
- Clothing - Use stretchy fabrics configured with darts and seams
- Backpacks - Sew simple bags and pouches
- Holsters - Stitch leather holders sized for weapons
- Belts/straps - Layer fabric over plastic bases
- Capes - Cut cloth circles gathered into pleats
Fabric paint adds designs onto soft elements. Use hot glue for quick attachments. For posing, wire armatures support material shape.
Advanced Figure Disassembly
For total teardowns, harder disassembly is required:
- Remove plastic rivets by drilling into their center pin point
- Wedge apart fused sections with an X-acto blade - go slowly to avoid cracking
- For solvent welds, soften joint with superglue debonder or acetone before prying apart
- Use cutting discs on a Dremel to slice apart joints and melt-fused segments
- To preserve small parts like wrist pegs, carefully cut/pry at the attachment point
- Heat can help release fused segments - use a heat gun on low setting
Work slowly and document with photos to assist reassembly. Some figures cannot be non-destructively disassembled.
Conclusion
With imagination and a few supplies, you can customize your Teenage Mutant Ninja Turtles action figures in amazing ways. Unique paint jobs, sculpted additions, kitbashed hybrids and themed bases let you put your own creative stamp on your turtle collection.
Take your time, have fun exploring different looks and keep refining until your figures are truly one-of-a-kind. Turtle power!
Frequently Asked Questions
What type of paint should I use?
Acrylic paints are recommended as they adhere best to plastic and are non-toxic. Be sure to use paints designed for modeling/miniatures.
How can I fix any paint mistakes?
Carefully wipe away minor fresh mistakes with a damp paper towel. For larger areas, you may need to strip the paint and start over. Avoid harsh chemicals and instead try gently rubbing with toothpaste or fine sandpaper.
How do I remove original paint to repaint a figure?
Use acetone nail polish remover applied with cotton pads or q-tips. Rub gently and take care around plastic parts and joints. Avoid immersing the whole figure.
What finishing steps help protect the paint job?
Apply 1-2 light coats of clear matte or gloss sealant spray. This protects paint from rubbing and handling. For display figures, a display case adds further protection from dust.
What types of found items work well for basing/accessories?
Plastic bits from model kits, beads, wire, natural items like rocks or sticks, jewelry findings, hardware parts, and terrain materials like sand or turf all make great embellishments.
Can I mix parts from different TMNT figure lines?
Generally parts are interchangeable across different manufacturers and series. But joint pegs and body proportions may vary, so be prepared to problem solve and improvise.
Is it difficult to take apart/reassemble Teenage Mutant Ninja Turtle figures?
Basic disassembly is easy with the right small screwdriver to access the screws. Some figures may use welded joints and "snap-fit" construction which is harder to take apart non-destructively.
Can I make fully articulated custom figures and outfits?
Yes, but it requires significant skill in modeling with plastics, fabrics and articulated armatures along with painting. Look for specialty modeling guides on ball joints and figure creation.
Recent Posts
-
He-Man’s Legacy: MOTU Collectibles in 2025
The Masters of the Universe (MOTU) franchise, led by the iconic He-Man, has left a powerful legacy i …Aug 26th 2025 -
Collectible TMNT Figures from the 90s
The Teenage Mutant Ninja Turtles exploded onto the scene in the late 1980s, and by the 1990s, they w …Aug 26th 2025 -
How to Style Your Loungefly Backpack
Loungefly backpacks are more than just practical accessories—they’re fashion statements, fandom show …Aug 26th 2025


